How to install the app on iOS
Follow along with the video below to see how to install our site as a web app on your home screen.
Note: This feature may not be available in some browsers.
You are using an out of date browser. It may not display this or other websites correctly.
You should upgrade or use an alternative browser.
You should upgrade or use an alternative browser.
91 FJ80 Build
- Thread starter Chkn
- Start date
Use it a whole ton for daily driving and going to the beach.
One trip to the beach we met at a friends house to caravan over and found that the water pump was leaking. We were already 40 minutes into the trip and only another 40 to our favorite beach spot so we packed 7 gallons extra of water and sent it.
Totally over prepared and only used 4 gallons of extra water Quite possibly only kept the water pump pulley on the water pump because the 3FE has belt tension from two different directions so the pulley can't wobble off.

3FE water pumps aren't super fun to replace but the job isn't too terrible you just have to remove everything. Replaced the thermostat and the decaying radiator too. Also painted the timing cover, looks like a million bucks now.


One trip to the beach we met at a friends house to caravan over and found that the water pump was leaking. We were already 40 minutes into the trip and only another 40 to our favorite beach spot so we packed 7 gallons extra of water and sent it.
Totally over prepared and only used 4 gallons of extra water
Quite possibly only kept the water pump pulley on the water pump because the 3FE has belt tension from two different directions so the pulley can't wobble off.3FE water pumps aren't super fun to replace but the job isn't too terrible you just have to remove everything. Replaced the thermostat and the decaying radiator too. Also painted the timing cover, looks like a million bucks now.
So decided a needed a new front bumper that provided some type of protection. Went with Coastal Offroad DIY bumper and have been pleased with it. I didn't like the horned rim glasses style that the high hoops can give so I cut them down lower and I like the look.


Bought some Methods during the Irate contest and got a ton of points, but didn't win anything!


Went to the beach again.

Back to the methods

Had to "machine" the outer lip with a die grinder so that the pilot was large enough to fit over the hub.


Went to the beach again.
Back to the methods
Had to "machine" the outer lip with a die grinder so that the pilot was large enough to fit over the hub.
The semi-float rear was coming due for service. The driver wheel bearing was loose and the axle seal was leaking. The shoes were old and worn. The wheel seals were decent on a good day and the parking brake did not work at all. So hopped on car-part.com and found a full float about an hour or two south of me. So picked it up and stripped it down. Cleaned the housing a painted it. Then replaced the parking brake shoes, the calipers, the rotors and all the good stuff.


Probably helps the cruiser drive so smooth

Probably helps the cruiser drive so smooth
Bought my cruiser and it came with an older 4x4Labs rear bumper. I suspect it was a DIY cause it doesn't have pretty welds and it fits mostly good. I wanted to add swing arms to it so that when I'm out driving I don't have to have the spare taking up space in the back of the truck. 4x4Labs will sell the swingout arms as a kit but its not cheap. So I decided I could build my own swing outs cheaper. Ordered the spindles from Trail Gear and got some steel from a local yard and got to work.
Trying to figure out the placement and length of tube required.

Using all the right tools


Still need to finish it up but it works good and it was like 1/3 the cost of purchasing it from 4x4Labs directly.
I wanted to add swing arms to it so that when I'm out driving I don't have to have the spare taking up space in the back of the truck. 4x4Labs will sell the swingout arms as a kit but its not cheap. So I decided I could build my own swing outs cheaper. Ordered the spindles from Trail Gear and got some steel from a local yard and got to work.Trying to figure out the placement and length of tube required.
Using all the right tools
Still need to finish it up but it works good and it was like 1/3 the cost of purchasing it from 4x4Labs directly.
Went camping some more and enjoyed it. Went camping and on the last ride of the day before heading home the alternator died. About 20 feet from this photo .


One of the drawbacks to driving a model exclusive 30 year old vehicle is parts availability. It was Sunday afternoon and the closest alternator was 7 hours away in Tennessee and wouldn't arrive until Wednesday. Luckily I had gotten AAA before we drove our 98 4Runner with 350,000 miles from GA to UT. Which we didn't end up needing. . So this 200 miles tow from NC to GA was covered with no extra fees. We all hopped into my buddies FJ Cruiser and with everyone crammed in finished out the day and made it home. If you have 3 adults, 2 kids and a dog I wouldn't recommend an FJ Cruiser

Threw the jump pack on it and drove it in the driveway. To dry out the tent.

.
One of the drawbacks to driving a model exclusive 30 year old vehicle is parts availability. It was Sunday afternoon and the closest alternator was 7 hours away in Tennessee and wouldn't arrive until Wednesday. Luckily I had gotten AAA before we drove our 98 4Runner with 350,000 miles from GA to UT. Which we didn't end up needing.
. So this 200 miles tow from NC to GA was covered with no extra fees. We all hopped into my buddies FJ Cruiser and with everyone crammed in finished out the day and made it home. If you have 3 adults, 2 kids and a dog I wouldn't recommend an FJ Cruiser Threw the jump pack on it and drove it in the driveway. To dry out the tent.
So I had been slowly finding components for an LS swap. The 3FE in the cruiser was old and tired. She still ran great but power was lacking and fuel economy was dismal. Two shining points of the 80 series . When driving up long grades the coolant temp would steadily rise and climb. Never overheated the motor but it would probably need to be opened up and repaired in the next few years. The cost to refresh a 3FE is surprisingly high. Might as well put that towards an LS swap. . So long story short the bad alternator was the catalyst to do an LS swap.
Pulling the front apart


Sitting a little light with no powertrain and drivetrain

. When driving up long grades the coolant temp would steadily rise and climb. Never overheated the motor but it would probably need to be opened up and repaired in the next few years. The cost to refresh a 3FE is surprisingly high. Might as well put that towards an LS swap. . So long story short the bad alternator was the catalyst to do an LS swap. Pulling the front apart
Sitting a little light with no powertrain and drivetrain
For the swap I wanted a Gen IV so I could go with the 6L80 transmission. I didn't want to mess with AFM/DOD. I didn't feel like paying a premium for a 5.3/6.0 to then spend more money to delete that ticking time bomb. So I searched out a 4.8l. Ended up with a Gen IV 4.8 from a 2008 Tahoe. Then for the transmission I got a 6L80 from a 2010 Camaro ss. Seller said it had low miles and I'm inclined to believe him. Trans fluid looked good and the transmission itself was clean. Bought the Marks 4WD adapter to use the factory transfercase. Oddly enough it was cheaper from Aus than from buying it from Advanced. I guess the exchange rate was in my favor
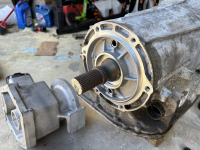
Now that I had the transmission and adapter I wanted to see how well they fit together. Found a few areas that needed to be massaged with the flap disk but nothing serious. I wish I had more pictures. Hopefully this thread will help me take more photos and document my stuff better.
The rib on top of the transmission needed smoothing so it didn't contact the adapter.

The transfer case adapter contacted the small extension cover so the adapter had to be kissed with the flap disc then it sat perfectly


The rib on top of the transmission needed smoothing so it didn't contact the adapter.
The transfer case adapter contacted the small extension cover so the adapter had to be kissed with the flap disc then it sat perfectly
Rugger99
Member
- Joined
- Dec 4, 2020
- Member Number
- 3110
- Messages
- 16
I like how yours turned out. I just got my kit delivered the other day and I am going to change up the tube work as well. Your 80 is pretty close to mine in appearance.So decided a needed a new front bumper that provided some type of protection. Went with Coastal Offroad DIY bumper and have been pleased with it. I didn't like the horned rim glasses style that the high hoops can give so I cut them down lower and I like the look.

chaplinfj60
Well-known member
so how long have you had the 80 its a crazy timeline for sure
I’ve had the cruiser for almost 4 years now. For the majority of that time it was my wife’s daily driver.so how long have you had the 80 its a crazy timeline for sure
Needed some of my sanity back so I moved to the engine and accessories. I believed the engine and accessories would fit without too much issue and I was mostly right. Plenty of clearance for the alternator but not so much room for the power steering.


Measuring the space that I have to work with.


I was having a hard time visualizing it so I transferred that info to onshape and came up with this diagram.

The origin is the crank bolt and the rectangle on the right is the power steering box. The circle is the power steering pump. I placed the steering box using the measurements from the above photos then perused the online catalogs to find which manufactures relocate the power steering to an area that would work with the cruiser. I ended up going with ICT Billet and their OEM alternator and tight power steering bracket. In hind sight I might have been able to save a few dollars and just got a smaller power steering pulley butttttt the factory accessory bracket looks like garbage and now I got +10 hp for looks.


Measuring the space that I have to work with.
I was having a hard time visualizing it so I transferred that info to onshape and came up with this diagram.
The origin is the crank bolt and the rectangle on the right is the power steering box. The circle is the power steering pump. I placed the steering box using the measurements from the above photos then perused the online catalogs to find which manufactures relocate the power steering to an area that would work with the cruiser. I ended up going with ICT Billet and their OEM alternator and tight power steering bracket. In hind sight I might have been able to save a few dollars and just got a smaller power steering pulley butttttt the factory accessory bracket looks like garbage and now I got +10 hp for looks.
So we’re mostly up to date. Truck has been torn down in the driveway for almost six months. It’s taking longer than anticipated mostly because I work on it one or two days a week on the weekend in the evenings and my motivation has been lacking 😂
Butttt I sorted out the fuel lines. Put the corvette fuel filter near the stock location. Ended up trimming the factory line and reflaring it so that I could route the fuel line better. It’s in the area of the exhaust so I’ll need to shield the filter or fuel lines.
Butttt I sorted out the fuel lines. Put the corvette fuel filter near the stock location. Ended up trimming the factory line and reflaring it so that I could route the fuel line better. It’s in the area of the exhaust so I’ll need to shield the filter or fuel lines.