What's new

Operation: Slug Nutz

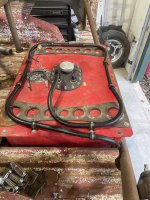
Funny, I just did the exact same thing with a hand me down fuel cell.

I agree with the stock fuel system being the best. I see so many guys with fuel pump issues when they try to build thier own with a frame mounted pump.
 
I haven't been working on the truck lately but I have been collecting parts. I'm getting ready to make a big push on the project! I have had the doubler adapter for a while and its is currently mocked up in the truck but the cases will have to come back out to get the rest of the parts installed. I have the Marlin Crawler comp 4.7 gears, Trail Gear cromo output shaft, Frontrange Offroad twin sticks and the Marlin Crawler shifter seats/boots. I also have the Busted Knuckle ball joint eliminators and the other WFO 14Bolt to Toyota driveshaft flange. I have the other one installed already when I did the gears in the rear axle.
 

Attachments

  • IMG_1817.jpg
    IMG_1817.jpg
    502.5 KB · Views: 23
  • parts.jpg
    parts.jpg
    2.2 MB · Views: 16
Motor mounts from 4xInnovations just showed up today
 

Attachments

  • E47D6D6F-F807-4EC0-9A01-9736C5A1E557.jpeg
    E47D6D6F-F807-4EC0-9A01-9736C5A1E557.jpeg
    1.8 MB · Views: 9
I gathered a few more small parts for the build. A new throw out bearing, some safety washers for my steering, poly bushings for my t-case mount and the front range t-case ring. I currently have the full front range crossmember in the truck mocked up but it isn’t going to work for my set up so I’m going to build my own crossmember. I’m going to work on the truck this weekend so I’ll take some pictures for an update.
 

Attachments

  • 27ED4C6D-7811-4A4B-943D-982D24029D63.jpeg
    27ED4C6D-7811-4A4B-943D-982D24029D63.jpeg
    2 MB · Views: 15
  • 66EF594F-8908-4E54-9258-9AED69602EBD.jpeg
    66EF594F-8908-4E54-9258-9AED69602EBD.jpeg
    2.1 MB · Views: 18
  • 10C320B4-FEFF-4F1E-BA70-712C070EB41B.jpeg
    10C320B4-FEFF-4F1E-BA70-712C070EB41B.jpeg
    2.8 MB · Views: 14
I worked on the truck over the weekend. This is what I was up against with the full Front range off road T-case mount. There was just no way that was going to work out.
 

Attachments

  • 47BBEB20-E2C5-4807-93E0-4007B6A661A3.jpeg
    47BBEB20-E2C5-4807-93E0-4007B6A661A3.jpeg
    2.3 MB · Views: 41
  • 64E6D19E-7DC9-4D2E-8DB4-BEE62F846A73.jpeg
    64E6D19E-7DC9-4D2E-8DB4-BEE62F846A73.jpeg
    2.2 MB · Views: 41
I purchased the T-case ring from Front range and it worked out awesome. I ended up making a super simple mount that just worked out really well for my setup here are a couple photos of the mock up
 

Attachments

  • 2EA240FB-F0A4-4C97-A33E-5D507D938E92.jpeg
    2EA240FB-F0A4-4C97-A33E-5D507D938E92.jpeg
    2.8 MB · Views: 34
  • 625A6430-220B-4475-88EF-50CCB3E5B880.jpeg
    625A6430-220B-4475-88EF-50CCB3E5B880.jpeg
    3.2 MB · Views: 31
Here are some photos of it completed
 

Attachments

  • C2F6E11B-EC2E-4A93-919D-FE5265ECE983.jpeg
    C2F6E11B-EC2E-4A93-919D-FE5265ECE983.jpeg
    3.3 MB · Views: 33
  • DE05A34C-DD32-49B8-A7A4-D57BFA4CD198.jpeg
    DE05A34C-DD32-49B8-A7A4-D57BFA4CD198.jpeg
    1.5 MB · Views: 33
  • 63AC0B4F-A618-4ACF-9B97-07A13C2B7A43.jpeg
    63AC0B4F-A618-4ACF-9B97-07A13C2B7A43.jpeg
    2.6 MB · Views: 34
I did a little tube work on the front end. It’s a little ugly but it’s all function. The truck is designed around running Toyota sheet metal. The front end is going to get dove nosed but retain the fenders and hood. I needed a way to hang the fenders, mount shocks and hang my hydro reservoir. It’s going to get more tube on the front to triangulate and have more protection for the engine and radiator. But hopefully with the skins it will look pretty good
 

Attachments

  • 8B3267D0-0884-4A42-9394-847325A951B0.jpeg
    8B3267D0-0884-4A42-9394-847325A951B0.jpeg
    3.9 MB · Views: 51
  • 51A64392-8374-4431-8671-98DF114D903E.jpeg
    51A64392-8374-4431-8671-98DF114D903E.jpeg
    2.4 MB · Views: 51
  • 4DC1F8A0-58C3-4979-8F27-72654484D767.jpeg
    4DC1F8A0-58C3-4979-8F27-72654484D767.jpeg
    3.5 MB · Views: 51
Marlin Crawler driveshaft kit showed up today
 

Attachments

  • A55DCC5F-AC98-4618-B519-E35EA15BBEB8.jpeg
    A55DCC5F-AC98-4618-B519-E35EA15BBEB8.jpeg
    3.7 MB · Views: 18
I worked on the truck a little bit this weekend. Started the front shock mounts, mounted the hydro resi, and added a little bit of tube
 

Attachments

  • 61E3F1C0-0F64-44BC-B143-DF94308424A1.jpeg
    61E3F1C0-0F64-44BC-B143-DF94308424A1.jpeg
    3.6 MB · Views: 35
  • 029C9E12-CEFE-4AD5-855B-9E4A1AB04913.jpeg
    029C9E12-CEFE-4AD5-855B-9E4A1AB04913.jpeg
    3.8 MB · Views: 35
  • C24F0436-BD46-4F13-B36F-3AB0B4385554.jpeg
    C24F0436-BD46-4F13-B36F-3AB0B4385554.jpeg
    4 MB · Views: 36
  • 910E5B87-E15F-489C-9B2E-13BC0D016B6B.jpeg
    910E5B87-E15F-489C-9B2E-13BC0D016B6B.jpeg
    3.7 MB · Views: 39
  • C077765D-E4B9-4F9E-B6D6-76C5F6AA0F0B.jpeg
    C077765D-E4B9-4F9E-B6D6-76C5F6AA0F0B.jpeg
    3.6 MB · Views: 40
I have been cranking on the truck the last couple weekends. I blew the knuckles off and installed ball joint eliminators on all four corners. I added a little bit of tube work, mocked up the rear steer valve, started plumbing the Hydro reservoir to pump. Installed the bronze bushings in the unit bearings, I assembled two of the axle shafts and u joints. I also finished welded the rear axle, assembled it, installed the brakes calipers and pads.
 

Attachments

  • 3F1C01B6-E8F2-49EB-BEE0-D4AA44A42636.jpeg
    3F1C01B6-E8F2-49EB-BEE0-D4AA44A42636.jpeg
    3.6 MB · Views: 40
  • D06AB68B-42C1-4978-BEFD-60E3D7065240.jpeg
    D06AB68B-42C1-4978-BEFD-60E3D7065240.jpeg
    1.6 MB · Views: 39
  • 4D0EE1C7-0A25-4086-854E-E2E4D7802A9F.jpeg
    4D0EE1C7-0A25-4086-854E-E2E4D7802A9F.jpeg
    1.6 MB · Views: 36
  • 29296CE1-FCC0-4395-A875-76971C8B19E8.jpeg
    29296CE1-FCC0-4395-A875-76971C8B19E8.jpeg
    2.2 MB · Views: 34
  • 8DDE9017-7574-400B-A747-96589CB2BEA8.jpeg
    8DDE9017-7574-400B-A747-96589CB2BEA8.jpeg
    2 MB · Views: 34
  • E0CA1057-60F7-4577-8E28-A71CCF7FA90B.jpeg
    E0CA1057-60F7-4577-8E28-A71CCF7FA90B.jpeg
    1.8 MB · Views: 35
  • E4B7511A-A2E9-406B-B327-DD57EEE1B80D.jpeg
    E4B7511A-A2E9-406B-B327-DD57EEE1B80D.jpeg
    1.8 MB · Views: 33
  • E1638BED-AB3B-4061-864A-95656EE2E742.jpeg
    E1638BED-AB3B-4061-864A-95656EE2E742.jpeg
    3.3 MB · Views: 38
  • C14834A6-689B-47ED-9B9B-A265BCCFCF32.jpeg
    C14834A6-689B-47ED-9B9B-A265BCCFCF32.jpeg
    3.9 MB · Views: 41
  • F37B78B0-C333-4541-96EA-C75A59AB3EC0.jpeg
    F37B78B0-C333-4541-96EA-C75A59AB3EC0.jpeg
    2.8 MB · Views: 44
This weekend I pulled the front axle and welded it out. I mounted the rear hydraulic ram welded the tabs for it to the tie rod. Trimmed the steering stops to match the throw of the ram. Made tabs to mount the rear brake lines. Then started mocking up the front ram mount.
 

Attachments

  • A6232C0B-1A39-483C-8908-20F70CC44640.jpeg
    A6232C0B-1A39-483C-8908-20F70CC44640.jpeg
    3.5 MB · Views: 40
  • C59E4E5B-A142-4860-92DF-A21F9F3F3991.jpeg
    C59E4E5B-A142-4860-92DF-A21F9F3F3991.jpeg
    2.1 MB · Views: 35
  • 1C953626-20E8-4AF2-806A-70F52EE98D12.jpeg
    1C953626-20E8-4AF2-806A-70F52EE98D12.jpeg
    3.5 MB · Views: 35
  • 77FD8945-9930-4466-8AE3-5CAB4E4D6FE0.jpeg
    77FD8945-9930-4466-8AE3-5CAB4E4D6FE0.jpeg
    1.8 MB · Views: 34
  • BF78EDCC-13A8-4C94-BCE1-07F30D98F34D.jpeg
    BF78EDCC-13A8-4C94-BCE1-07F30D98F34D.jpeg
    1.7 MB · Views: 36
  • 78081904-9D03-457D-B5D5-ED749C31BFBC.jpeg
    78081904-9D03-457D-B5D5-ED749C31BFBC.jpeg
    2.3 MB · Views: 39
  • 3E62E3CD-CC4E-4C84-A57C-98DB898DA2AC.jpeg
    3E62E3CD-CC4E-4C84-A57C-98DB898DA2AC.jpeg
    3.8 MB · Views: 37
  • 86139C5C-27E7-423F-ACE4-514838D9E0AC.jpeg
    86139C5C-27E7-423F-ACE4-514838D9E0AC.jpeg
    4.4 MB · Views: 38
  • 92AB9A19-3D79-487F-8F45-250C93495CF9.jpeg
    92AB9A19-3D79-487F-8F45-250C93495CF9.jpeg
    4.5 MB · Views: 40
Here is just a couple photos of the truck as it sits
 

Attachments

  • D26D7832-658D-4476-96EB-CFC0BB1F34BA.jpeg
    D26D7832-658D-4476-96EB-CFC0BB1F34BA.jpeg
    1.7 MB · Views: 37
  • 205E3DBD-63C8-4AF2-81BF-79D97241E229.jpeg
    205E3DBD-63C8-4AF2-81BF-79D97241E229.jpeg
    3.5 MB · Views: 40
  • 38BC5AB2-ABB5-4F04-BDA5-51EB0E0D4B01.jpeg
    38BC5AB2-ABB5-4F04-BDA5-51EB0E0D4B01.jpeg
    3.6 MB · Views: 39
one steering pump or two. forgot. thanks

and what did you do for axle lengths, are any of the shafts the same? are they off the self size length?
what carrier did you use.
gonna re read.
damit man. i apologize if you said all this before.
 
one steering pump or two. forgot. thanks

and what did you do for axle lengths, are any of the shafts the same? are they off the self size length?
what carrier did you use.
gonna re read.
damit man. i apologize if you said all this before.
I will be running one steering pump. So my steering set up so far will consist of a used Trail Gear full Hydro kit, 2) 8” PSC single ended rams, an electronic hydraulic solenoid for the rear ram and a momentary contact joystick from McMaster-Carr. So I’ll be running the trail gear pump with the trail gear reservoir with filter, trail gear cooler and the trail gear orbital, then the PSC rams and the electric hydraulic solenoid. There are definitely compromises in this set up, but I’m on a budget and will probably upgrade when funds allow and I figure out what needs to be replaced. So far the trail gear reservoir is ventless, which works fine with the dual ended ram, but since my fluid levels will be fluctuating with a single ended ram, especially two of them, I will have to run a vented system. The other thing that I’m going to run into with my set up is that since I’ll be fluctuating fluid level so drastically by having two single ended rams, I might have to increase my reservoir volume to accommodate the fluctuation. Also, I’m not sure if the trail gear pump is going to be able to pump enough volume for the larger rams? My steering may be really slow? And I’m not sure that I’m going to be completely happy with a load sensing orbital. I posted about the axle shafts, but I don’t know if I ever specified what the differentials are. Both differentials are 5.38s with welded stock carriers.
 
thanks for the updates.

if you need to vent your PS steering and don't want a mess. you can run 1/4 push lock air lines going to a roll cage tube. and drill and tap a small hole for 1/4 inch air fitting and run the line to there. then put a pipe pug in and drain off excess fluid.and a tiny hole up high just to vent pressure.

basically making a catch can but using your roll cage tubbing for that.

so one pump, two rams,

good news is usually you not running both ends at the same time, could you install a second TC pump on the other side of the engine?where the AC went? i am sure you have thought about it.

i just looked up that switch good call. thats neat.
Thats a great idea for the steering vent! I think if the trail gear TC style pump isn’t enough for my system instead of running two pumps, I think I would run one larger pump. But yes, you are correct. I would put it on the side where the A/C would go with a custom bracket and I think I would have to install an idler pulley where the current power steering pump is with a tensioner style bracket. To keep the rest of the accessories working properly. But we will cross that bridge when we get there
 
I worked on the truck over the weekend but didn’t take very many pictures. I plumbed the hydro system and started running the hard-lines for the brakes.
 

Attachments

  • 1121B50B-895E-4C3F-B35E-409F7FB3DE6A.jpeg
    1121B50B-895E-4C3F-B35E-409F7FB3DE6A.jpeg
    1.8 MB · Views: 24
  • 84371C9B-B383-4CA8-8FB8-ADB81259B45A.jpeg
    84371C9B-B383-4CA8-8FB8-ADB81259B45A.jpeg
    4.3 MB · Views: 25
  • 964EF201-2122-4402-922F-85A5C214E52F.jpeg
    964EF201-2122-4402-922F-85A5C214E52F.jpeg
    2.3 MB · Views: 28
More part showing up, I got some driveshaft ends from WFO, I got an emergency stop button for my ignition (pull out for maintained contact) , a green normally open momentary contact switch for my starter, and the correct contact blocks for my rear-steer joystick. I’ve had the joystick for about a week now, but I ordered the wrong contact blocks on the first go around.
 

Attachments

  • 68743BE4-3A35-44AC-BE8A-28E5D984A08B.jpeg
    68743BE4-3A35-44AC-BE8A-28E5D984A08B.jpeg
    1.7 MB · Views: 23
  • 3010870C-6E8E-4B4E-9096-3D2682AAE73D.jpeg
    3010870C-6E8E-4B4E-9096-3D2682AAE73D.jpeg
    1.9 MB · Views: 22
  • AC5D04F6-14F4-44FC-A2F9-8FFB6185AFCD.jpeg
    AC5D04F6-14F4-44FC-A2F9-8FFB6185AFCD.jpeg
    1.5 MB · Views: 22
All of the parts for plumbing my fuel system showed up today. I also needed a few more brake line fittings to finish plumbing my brakes that showed up as well.
 

Attachments

  • EDC6C469-2235-4EBC-A9EE-69CBF72A2815.jpeg
    EDC6C469-2235-4EBC-A9EE-69CBF72A2815.jpeg
    2.1 MB · Views: 15
I have been cranking on the truck the last few days and got quite a bit of stuff done. I took the hydro lines out that go to the rear ram and wrapped them in the hydraulic spiral wrap. I needed an adapter for my master cylinder from the sky off-road mount. I’m running a different master cylinder than they recommend since I’m running front brakes, all the way around. one of my buddies had some experience with a set up similar, and he suggested a different master cylinder for me. I mounted all of the hydro lines. Started running the fuel lines. Welded the front ram mount and cut the steering stops to match the ram. Plumbed the front brakes. Installed the WFO Toyota to 14 bolt flange. Rebuilt my front t case shifter
 

Attachments

  • E2F91200-9315-457B-A6E9-74ED022261CA.jpeg
    E2F91200-9315-457B-A6E9-74ED022261CA.jpeg
    4.2 MB · Views: 32
  • 9EF3344B-835E-4677-B146-B61E37195FEF.jpeg
    9EF3344B-835E-4677-B146-B61E37195FEF.jpeg
    3.8 MB · Views: 31
  • C652EF16-BBAB-4301-8FE0-4069BA38CE2E.jpeg
    C652EF16-BBAB-4301-8FE0-4069BA38CE2E.jpeg
    1.3 MB · Views: 31
  • 6E84625F-3AA5-44D0-BC4E-506D13B52AC8.jpeg
    6E84625F-3AA5-44D0-BC4E-506D13B52AC8.jpeg
    2.5 MB · Views: 29
  • 5DEB4BA7-51E9-41EB-9991-33BEE22D9D3F.jpeg
    5DEB4BA7-51E9-41EB-9991-33BEE22D9D3F.jpeg
    1.8 MB · Views: 28
  • 51BCE830-92C8-4461-9C80-B0EF2EF55FE1.jpeg
    51BCE830-92C8-4461-9C80-B0EF2EF55FE1.jpeg
    3.7 MB · Views: 27
  • 4D1DD7E2-9859-49F6-AC02-54E7211C1C9C.jpeg
    4D1DD7E2-9859-49F6-AC02-54E7211C1C9C.jpeg
    1.5 MB · Views: 27
  • 44689B06-26AA-4071-A68C-52F9BC3EDE0A.jpeg
    44689B06-26AA-4071-A68C-52F9BC3EDE0A.jpeg
    2.5 MB · Views: 25
  • 5FFFB203-9596-4B48-9388-0EF99113E1FD.jpeg
    5FFFB203-9596-4B48-9388-0EF99113E1FD.jpeg
    1.4 MB · Views: 31
  • 5F5687E4-3E78-4BE9-A71D-616D18F16971.jpeg
    5F5687E4-3E78-4BE9-A71D-616D18F16971.jpeg
    3.6 MB · Views: 30
that master cyl adapter you got i got the same one only to find out it would not work with my master, damit.. so i have to build my own.
 
Here are some photos of it completed

This will not last long.

You need to spread the load out along that tube further. It will rip off that tube, bend it, or both.

Also, you should have the tcase crossmember bushings closer together. The "triangle" method is what seems to work best. The way it is now, when your chassis flexes, it's trying to twist your drivetrain.

I had a similar set up in my samurai with toyota cases and cracked the tcase housing. My current rig has the bushings closer together, right near the tcase which has been nicer to the tcase, but the tubing has broken twice.

These little motors may not put down much power, but multiply it by 42 before it get to the driveshaft and they will tear stuff up.:laughing:
how do you see anything with such small pictures. :stirthepot::stirthepot::stirthepot:
 
Top Back Refresh