What's new

Scratch and Dent Special: Dirty Hooker Edition

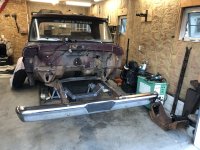
Wait...Im building a truck...shit. Outboard engines got in the way....

IMG_2729.jpeg

Sold canoe.

IMG_3093.jpeg

Bought boat.

IMG_3072.jpeg

Rebuilt a 1947 KF5, Mercury 5hp!

Ohhhh, and I guess I got my hubs in from Sandy šŸ˜Ž

1ā€ King ping spindles from a ā€˜81 E350. I put new bushings/pins in and shipped to Sandy. He set up the mounts and clearances for the brakes, and while he was at it he machines the new bushings for the new kingpins (reamed)

IMG_2910.jpeg

IMG_2911.jpeg

IMG_2912.jpeg
 
Last edited:
Looks blingy:smokin: But who/ what / where TF is a Sandy? :laughing:


Hes a guy who makes shit. He'd fit right in here on the board. Makes shit. Fixes shit. Breaks shit. You know...the stuff we all tend to do lol
 
Update: Hobart 120v keeps acting up (wire feed pulses), so I finally plugged in my Mexican 220v Linde that I bought is Casa Grande Arizona and trucked back across the country with a full bottle with no safety cap on it šŸ˜. I suck ass with the Linde.

IMG_3754.jpeg

Measuring and locating of a fixed point. Remember the truck was smashed from the drivers front towards the passenger rear


IMG_3767.jpeg

Got a good schematic sheet online

IMG_3768.jpeg

IMG_3769.jpeg

IMG_3770.jpeg

IMG_3771.jpeg

IMG_3772.jpeg

IMG_3774.jpeg

My fine machinery!

IMG_3765.jpeg

Amazon bumper fit perfectly! I bought the biggest size bolts that would fit in the frame horns in order to take up a slack/tolerance.

Welds suck ass and I have gapsā€¦BUT, Iā€™m learning and will get better. Until then Iā€™m going to experiment some which will include some grinding and trying different techniques. Once I get these on, Iā€™ll start on the new crossmember.
 

Attachments

  • IMG_3771.jpeg
    IMG_3771.jpeg
    1.8 MB · Views: 2
Little update. Did some measuring for WMS to WMS (aiming for 68ā€) on the rear. Spent hours combing tire sizes, and tried to figure the best way to hopefully squeeze tires inside these fenders and bedsides.

I also watched a ton of videos on pizza cutters versus normal/wide tires. They compared contact patches from 40psi down to 0psi, pizza cutters actually winning due to "the caterpillar effect"ā€¦.in turn I went with 255/80r17:

IMG_4001.jpeg


Wood is set at 68' WMS to WMS
IMG_4002.jpeg

IMG_3994.jpeg


Been picking away at ideas for the interior. Initially eye'd a set of PRP's, but with suspensions cost I needed to get by with something cheaper. Found a king ranch front bench seat, so pulled all the springs off my stocker (which was roached), and started mocking up the king ranch seats to fit that frame. Doing it this way still allows me to have sliders/be able to fold forward. Ironically the guy who was selling the seat had a '76 crew cab with a 460. Other than the show I went to while in Arizona...not often you meet folks with crew cabs.
IMG_3899.jpeg

IMG_3921.jpeg

IMG_3926.jpeg

Not done yet, but weā€™re getting there.


IMG_3959.jpeg

Side one sucked ass


IMG_3961.jpeg

Side two wayyyyy better


Off Topic Crew Cab Content: built a rack on the fummins to hold the boat. it was an idea I had and for $25 worth of wood and a trip to Home Depot with the dog (she LOVES the place) this makes it so I can still use the bed while transporting the boat. Straps all attach to bed, so framework is sandwiched between boat and truck itself. Was going to strap to the frame, but figured with the overhang of the boat...and going 45mpg on the Golden Road up north....id be flirting with the boat/frame itself bouncing out.
IMG_4041.jpeg


Also lowered the front an inch as the alcans settled and I had massive Carolina Squat going on. Still looks like I have some, but its wayyyyy more level than it was. All around 8/10....only issue is now my steering wheel isnt straight due to dropping the front so much :homer:
IMG_4046.jpeg
 
Last edited:
Finished the seats. Probably have eight hour of time into the whole thing. Bottom cushions are fully removable and bolt in (as you saw previously). Top ones I ended up welding to the rear frame work. It gave me the alignment I wanted and was simply the easiest method to get them on there. Didnt even light the seats on fire when welding them :cool2:
IMG_4047.jpeg


Little plates down bottom to span the gap from the frame to the seats
IMG_4048.jpeg


Never coming off!
IMG_4049.jpeg


Next up was scraping sweet purple tint off. I absolutely didn't appreciate the heinous purple tint......fuck that shit...eww its out. Heat gun and a square razon. Off you go...It looks like at one point there was a typical 90's sticker of Calvin pissing on a Chevy Logo, but it faded away. Ill see if I can snap a pic of it at some point. Can definitely tell this truck dies in the early 90's.
IMG_4065.jpeg


Cleaned the floor in prep for the seat! Orange wire is for the fuel gauge (new tank will be located behind rear axle, going to utilize I think its a mustang tank).
IMG_4069.jpeg


Boom. Seats installed! Im trying to hold off making everything perfect with this truck and keeping her a little rough...but they are way nicer than the rest of the truck. Side Note: new floor pans are in the bed. TBD when Ill do them.
IMG_4087.jpeg


Ewwwwwwww purple
73923785906__EDB630AA-EACA-41C2-82DA-5F7A81F29731.jpeg


Scritch scratch....clean as a whistle. On the Fummins I bought new smokers windows and they've never fit well or sealed (which I was warned of). This go around I'm keeping the stockers as you see. They (as well as the window glass) is all in decent shape so no reason to replace it! I am currently in the process of doing all new weather-stripping and felt within the doors. Pics of that to come in the next few days.
73923787272__0A8E2414-5631-4F28-8624-B2A487EAEF5B.jpeg


73923676419__2B60375F-436F-4E2A-8EC6-4A58B4C56EAF.jpeg
 
Last edited:
Got both driver and passenger windows clean of clean, reinstalled new felt and window track rubber. Had bought a new crank for driver side, knowing that the original was missingā€¦.didnā€™t realize that I donā€™t have an interior latch for the drivers side. ā€¦..that just means you have to put the window down to get out šŸ˜Ž
IMG_4179.jpeg


Chopped the passenger side welds I did a few weeks ago and fixed the sag. Used a magnetic angle finder on the bumper along with a couple measurements to inside itā€™s both square AND level.
IMG_4199.jpeg


Turns out the frame horns I got came from a ā€˜67! If anyone can decode and decipher the vin (from the ā€˜67) that would be cool!

IMG_4202.jpeg


Typical CAD work
IMG_4204.jpeg

IMG_4205.jpeg


Pics for reference when I fuck shit up in my next post
IMG_4210.jpeg

IMG_4226.jpeg

IMG_4229.jpeg

IMG_4228.jpeg
 

Attachments

  • IMG_4230.jpeg
    IMG_4230.jpeg
    2.4 MB · Views: 2
Put a new tip on the Alamogordo plasma cutter.....and she rips!
IMG_4230.jpeg


Slicing away since the thing works so well
IMG_4231.jpeg


In typical fashion:
IMG_4232.jpeg


I may have practiced my welds on the inside of the frame rails,, when putting the new frame horns on. Sadly...they are almost as BAD as the stock ford welds :flipoff2:
IMG_4234.jpeg


EVICTED:
IMG_4233.jpeg


Can I just say that making all those miter cuts took some time? I tried a portaband. Michael J Fox could have cut straighter. Plasma I wasn't confident at even after using a guide...so I decided my best method was a straight edge, a carboard template for 67*, and a tape measure. It took a lot of time but by the end I was a pro!
73965182330__8B8D1C7D-956C-4FA2-AD5B-DFD1E74E7F59.jpeg


The plan:
IMG_4207.jpeg


The wasteland:
73965183615__8FDBDCB1-D5B6-4DE7-9A7C-CF58631D4E62.jpeg


IMG_4237.jpeg


Definitely a lot of stuff in there to "dig" out.
IMG_4238.jpeg
 
Last edited:
Cleaned up the interior of the frame with a flap disc and some swearing!

Drivers side:
IMG_4240.jpeg


Passenger Side:
IMG_4241.jpeg


Combo of both so you can see my precision and perfection:
IMG_4242.jpeg


The pieces:
IMG_4243.jpeg

The pieces prepped for a tack.....and prepped to hide the visible learning curve I have for the miter cuts:
IMG_4244.jpeg


Ill end up using some flat plate to cap the open spaced of the 2x8, and will also add some gussets from he 2x4 square to the flat plate...then fish plate seams....I dont want this fucker to break!
IMG_4245.jpeg


IMG_4246.jpeg


Turns out I mismeasured and the 2x4 piece was too long. Had an added inch on each side. As opposed to take it off the square ends...I was looking to mimic the original crossmember with its spread/angle...so I cut the tacks on one side and used two inch painters tape to mark and cut two inches off the 2x4 piece. Smart...I know.
IMG_4247.jpeg


IMG_4248.jpeg
 
Last edited:
Pre correction:
IMG_4250.jpeg


Post Correction:
IMG_4251.jpeg


Let me state this in case I havent. Goal with making a new cross member is to both lower the engine and gain clearance for the beams. THe tranny contacted the tunnel, and this tuck is a factory column shift. THat means no removable cover for the tranny tunnel. On the Fummins I ended up modifying both the tranny tunnel of the cab itself, and the removable cover. Didnt want to play that game here, and knowing a lower center of gravity will help my situation...I decided upon what you see. Build a crossmember which will receive the engine mounts I bought AND allow me to place it where I need it. Overall the height is shallower, so I gain clearance for the beams as well.

IMG_4252.jpeg


Moved all the tools to the driveway, blew them off with air, and spent a LONG time cleaning up the garage, Its amazing how much metal dust accumulates....I used goggles, safety glasses, gloved and a buff (mask caused glasses/goggles to fog and make plasma cutting and such impossible). I still feel like I got the black lung.
IMG_4253.jpeg


This coming week Ill attach the motor mounts to the engine/tranny combo, remove the top crossmember and figure out final positioning of it all to start finalizing crossmember placement.
IMG_4254.jpeg


IMG_4255.jpeg


Thoughts and opinions? Comments? :flipoff2:
 

Attachments

  • IMG_4253.jpeg
    IMG_4253.jpeg
    2.5 MB · Views: 2
Last edited:
Top Back Refresh